Master Git Merge Conflict Resolution: Expert Tips & Strategies
Struggling with git merge conflict resolution? Discover effective techniques and real-world examples to resolve conflicts swiftly and prevent future issues.
Git merge conflict resolution is all about manually stepping in when Git can’t figure out how to combine changes from two different branches on its own. The process involves you, the developer, deciding which code to keep, cleaning up the special markers Git inserts, and then committing the correct version to finalize the merge.
Why Merge Conflicts Happen and How to Spot Them Early

Merge conflicts can feel like a major roadblock, but they’re actually a normal, healthy part of working on a team. A conflict is just Git’s way of hitting pause and saying, “I see two different changes to the same spot, and I need a human to make the final call.” It wisely hands the reins back to you, the developer, who has the context to make the right decision.
This usually happens when Git comes across competing changes it can't automatically blend together. For instance, imagine two developers are working on the same checkout page. One developer, on a feature branch, updates the button text from "Pay Now" to "Complete Purchase." At the same time, another developer on a different branch changes that same button text from "Pay Now" to "Secure Checkout."
When it's time to merge both of these branches into main, Git looks at that one line of code and sees two different histories. It has no way of knowing which change is the correct one, so it flags a conflict.
These situations are incredibly common and require you to jump in and sort things out. You can handle this directly in the file with a text editor or use a visual merge tool like the one built into or a dedicated app like . And if a conflict looks too messy to untangle, remember you can always abort the merge and rethink your approach.
To help you get ahead of these issues, here are some of the most frequent scenarios that trigger a merge conflict.
Common Git Merge Conflict Scenarios
Knowing what to look for makes the whole process less intimidating. The key is to spot the conflict, understand the cause, and then confidently apply the right fix.
Recognizing the Telltale Signs
The first step in any git merge conflict resolution is simply noticing that you have one. When you try to run a merge that triggers a conflict, Git won't be subtle. It will stop everything and give you a clear warning in your terminal.
You’ll see a message like: Automatic merge failed; fix conflicts and then commit the result.
That message is your cue. Git has already done the helpful work of marking up the conflicted files to show you exactly where the trouble is. Inside the file, you'll find a few distinct visual markers:
<<<<<<< HEAD: This points to the beginning of the code from your current branch (what Git calls "ours").=======: This line is a separator. Everything above it is your change, and everything below it is the incoming change.>>>>>>> [branch-name]: This marks the end of the code from the other branch you're trying to merge (what Git calls "theirs").
Actionable Insight: By understanding these markers, you transform a cryptic error message into a clear map pointing directly to the problem areas. This knowledge removes the initial panic and allows you to approach the resolution process with confidence and a clear plan of action. Your job is simply to clean up these markers and decide what the final code should look like.
Your Practical Guide to Resolving Merge Conflicts
So, Git has just flagged a merge conflict. Don't sweat it. This isn't a sign of failure; it's Git tapping you on the shoulder and asking for your expert opinion. The automated merge hit a snag and paused, so it's time for you to step in and sort things out. Once you know the ropes, cleaning up the file and finalizing the merge is pretty straightforward.
Your first step is to open up the conflicted files in your favorite code editor. Git makes this easy by listing them for you right in the terminal, usually under a heading like "Unmerged paths." When you open one up, you'll immediately see the conflict markers Git inserted: <<<<<<<, =======, and >>>>>>>. These are your signposts for fixing the issue.
Navigating the Conflict Markers
Think of these markers as a visual breakdown of the two competing changes.
- The code between
<<<<<<< HEADand=======shows the changes from your current branch (what Git often calls "ours"). - The code between
=======and>>>>>>> [branch-name]shows the incoming changes from the branch you're trying to merge in (what Git calls "theirs").
Your job is to play editor and decide what the final version of the code should look like. You've got a few options here:
- Keep your changes: If your version is the correct one, simply delete the incoming changes and all the conflict markers.
- Accept incoming changes: If the other branch has it right, just remove your code and the markers, leaving only their version.
- Blend both versions: This is the most common scenario. You'll need to manually edit the code, picking and choosing pieces from both sides to create a single, correct version.
Maybe you need to keep a function name from your version but accept a new parameter that was added in the incoming one. It's a judgment call. Once you've made your decision and scrubbed all the <<<<<<<, =======, and >>>>>>> markers from the file, it should look exactly as you want it to appear in the project's history.
This handy visual breaks down the three core parts of a conflict marker you'll need to deal with.
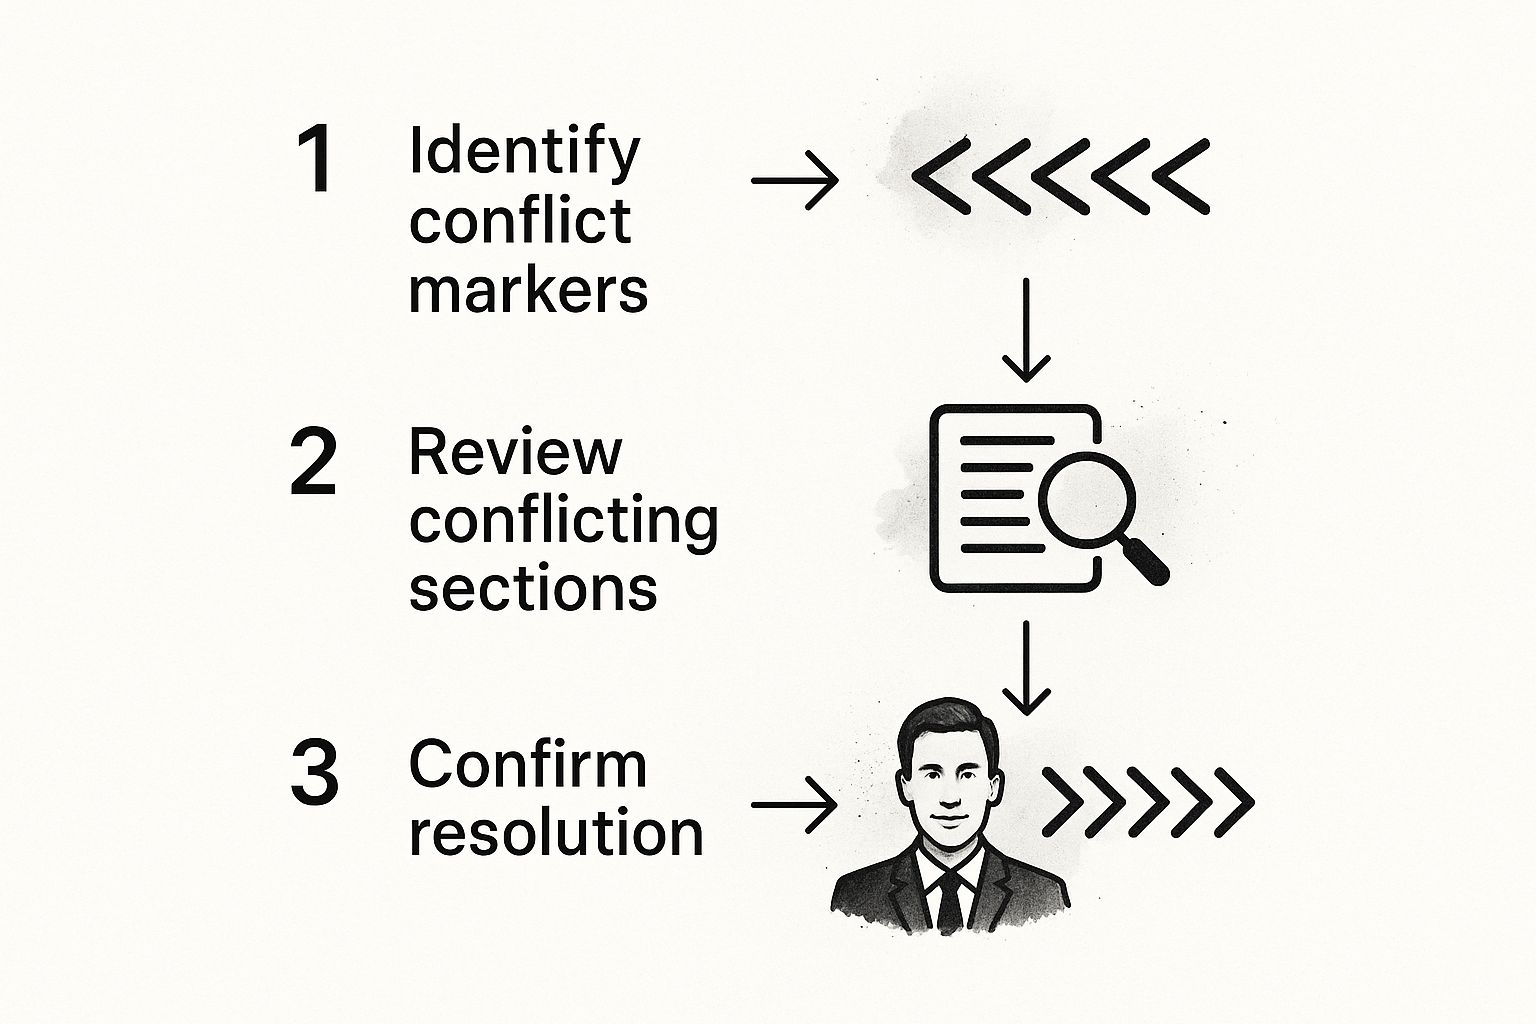
The key takeaway is that each marker has a specific job: one points to your changes, one separates the two versions, and the last one signals the end of the incoming changes.
Finalizing Your Resolution
Once you've edited all the conflicted files and they look good, you need to let Git know you're done. This is a critical step in the git merge conflict resolution process. You’ll stage the cleaned-up files using the git add command.
git add conflicted-file-1.js conflicted-file-2.css
Adding the files tells Git the manual part is over and you're ready to move forward. This doesn't create a new commit just yet; it simply marks the conflicts as officially resolved.
With all your resolved files staged, the final step is to run git commit.
git commit
This command will open your text editor so you can write a commit message. Git usually populates it with a helpful default message like "Merge branch 'feature-branch'," which you can either keep as is or add more detail to. As soon as you save that message, the merge is finalized. A new merge commit is created, officially weaving the two histories together.
Actionable Insight: For teams looking to smooth out these bumps, more advanced platforms like have integrated coding assistants that can help. These tools can explain what complex code blocks are doing, which can speed up debugging and give you the context you need to resolve conflicts faster. It’s all about making more informed decisions when you're blending changes.
And that's it! Your branch is now successfully merged, and that conflict is a thing of the past.
Using Modern Tools for Smarter Conflict Resolution
While getting comfortable with the command line is essential for truly understanding Git, you don't have to live there. Modern tools can take the pain out of merge conflicts, speeding things up and seriously cutting down on the risk of human error.
Visual diff and merge tools, especially those baked right into editors like , turn a confusing mess of conflict markers into a clear, interactive interface.
Leveraging Visual Merge Tools
For many developers, a good graphical user interface (GUI) is the key to untangling complex conflicts. These tools lay everything out for you, so you can focus on the why of the code changes, not the how of fixing the conflict syntax.
They usually show you a three-way view: your changes, their changes, and the final result in the middle. Instead of manually hacking away at <<<<<<<, =======, and >>>>>>> markers, you just click buttons to accept the changes you want. It's far more intuitive.
A few popular options you'll run into are:
- Integrated IDE Tools: Most modern editors like VS Code and the suite of (think IntelliJ or WebStorm) have fantastic built-in merge tools that pop up automatically when you need them.
- Standalone Applications: If you want something a bit more powerful, dedicated tools like or offer advanced features and can be set as your default mergetool across all your projects.
Actionable Insight: A visual tool gives you a map of the conflict, letting you make faster, more confident decisions. The idea isn't to forget how Git works under the hood but to enhance your workflow, turning a frustrating roadblock into a quick pit stop.
Comparing Conflict Resolution Methods
Choosing the right tool often comes down to the complexity of the conflict and your personal preference. Here’s a quick breakdown to help you decide which approach to take.
Ultimately, having all three in your toolkit means you're prepared for whatever kind of merge mess comes your way.
Embracing AI for Proactive Resolution
The next leap forward in handling merge conflicts is all about artificial intelligence. New tools are emerging that can analyze your code, understand the intent behind the changes, and suggest smart resolutions automatically. In fact, some studies have found that developers using AI-powered tools can slash their resolution times by up to 25%.
Actionable Insight: For teams wanting to get ahead of conflicts before they even happen, a platform like Zemith offers a more integrated approach. Its built-in AI coding assistant helps streamline the entire review and integration process. By encouraging better code quality and collaboration from the start, these kinds of tools help tackle the root causes of nasty merges. You can learn more about the benefits of an in our guide.
The right tool for you really depends on your team's workflow and the types of projects you handle, but adopting a more modern approach is a surefire way to boost everyone's productivity.
Proactive Strategies to Prevent Merge Conflicts

When it comes to git merge conflict resolution, the best offense is a good defense. While knowing how to fix a conflict is essential, you can save your team a world of hurt by adopting habits that prevent them from happening in the first place. This is all about shifting from a reactive mindset of cleaning up messes to a proactive one built on collaboration.
The single most effective habit you can build is to pull frequently from the main branch. I mean it—before you even think about starting a new task or writing a fresh line of code, run a quick git pull origin main. This simple command syncs your local repository with the latest team updates, ensuring you're not building on outdated code. It’s a tiny action that sidesteps a huge number of potential conflicts.
Keep Your Feature Branches Short and Sweet
Long-running feature branches are merge conflict magnets. It's a classic scenario: a branch stays open for weeks while the main branch evolves, and by the time you try to merge, the two have diverged so much that integration feels like open-heart surgery.
The trick is to keep your branches as short-lived as possible. Break down big features into smaller, bite-sized tasks that can be coded, reviewed, and merged within a day or two. This approach means you’re doing smaller, more frequent merges, which are infinitely easier to handle if a conflict does pop up. Plus, it keeps a steady stream of progress flowing into the main codebase.
Actionable Insight: By keeping branches focused and brief, you ensure that merges are small, incremental updates rather than massive, high-risk integrations. This not only prevents conflicts but also makes your code review process faster and more effective.
Make Small, Atomic Commits
Just as important as short-lived branches are small, focused commits. Every commit should represent a single, logical unit of work—fixing one bug, adding one function, or refactoring one module. Resist the temptation to lump unrelated changes into a single monster commit. It makes your intentions impossible to decipher and turns resolving a merge conflict into a nightmare.
Actionable Insight: For any team looking to sharpen their skills, digging into version control best practices is a great next step. Clean, atomic commits create a clear, readable project history that becomes a lifesaver during debugging.
Talk to Each Other! It’s That Simple.
At the end of the day, a surprising number of merge conflicts are just symptoms of poor communication. If two developers are unknowingly editing the same file, they're on a collision course. Regular, open communication is your best tool to avoid this.
- Announce your plans: Before diving into a new task, just give your team a heads-up. A quick "Hey, I'm about to work on the user authentication flow" can prevent someone else from stepping on your toes.
- Use your project management tools: Your or board isn't just for managers. It gives everyone a clear view of who's doing what, which helps spot potential overlaps early.
Actionable Insight: There's a clear link between well-defined workflows and team output. Studies have shown that teams prioritizing communication and frequent merges can boost their release frequency by 40%. Platforms like Zemith help tackle this head-on by creating integrated AI-powered workspaces that centralize project information, fostering the kind of collaborative environment where conflicts are far less likely to happen.
Handling Advanced and Tricky Merge Scenarios
Eventually, every developer runs into a merge conflict that’s more than just a few mismatched lines of code. These tricky situations can feel a bit daunting at first, but once you know the right commands, they become just another part of the workflow. Honestly, knowing how to navigate these edge cases is what really levels up your Git game.
A classic headache is dealing with a conflict in a binary file. Think PNG images, compiled libraries, or PDFs. Git can't show you the usual line-by-line differences with conflict markers, so you're left with a simple, stark choice: which version do you keep?
Making a Decisive Choice with Ours or Theirs
When a binary file is in conflict—or even when a text file's changes are so tangled that manually merging them is out of the question—you have to pick a winner. This is where git checkout really shines.
You can explicitly tell Git which side of the conflict to accept:
git checkout --ours path/to/file.png: This command keeps the version from your current branch and simply throws away the incoming changes.git checkout --theirs path/to/file.png: On the other hand, this one overwrites your version, accepting the file from the branch you're trying to merge.
Once you run the command, just git add the file to let Git know the conflict is resolved. It’s a powerful way to end the debate and move on, but be careful. You're intentionally discarding one person's work, so make sure it's the right call.
The Deleted File Conflict
Here’s another one that trips people up: the "deleted by us, modified by them" conflict. This happens when you delete a file in your branch, but in another branch, a teammate has been busy making changes to that exact same file. Git gets stuck, asking, "Did you really mean to delete all their new work?"
To get past this, you have to state your intention clearly.
- To go ahead with the deletion, run
git rm path/to/file. - To keep their modified version of the file, run
git add path/to/file.
This gives Git the final answer it needs to complete the merge.
Actionable Insight: In these more complex situations, your job is to give Git the clarity it's missing. By decisively choosing a version or confirming an action like a deletion, you take control and steer the merge to a successful finish.
Conflicts During a Git Rebase
Conflicts during a git rebase can feel a lot more confusing than a standard merge. That’s because a rebase works by replaying each of your commits, one by one, on top of another branch. When a conflict pops up, the whole process pauses mid-replay, and you're left in a temporary, detached HEAD state.
The fix is pretty similar—you edit the conflicted file and then git add it. But to move forward, you run git rebase --continue instead of git commit. And if things get too messy and you just want out, git rebase --abort is your escape hatch.
A pro tip for dealing with complex logic during a rebase is to simplify the code before you even start. We have a whole guide on that can make this process way smoother. The key with a rebase is to just focus on solving one conflict at a time as Git moves through each commit.
Common Questions About Git Merge Conflicts
Even when you've got the hang of fixing conflicts, some situations just feel tricky. We've all been there. Knowing the right command or concept can be the difference between a five-minute fix and an hour of frustration. Let's walk through some of the questions I hear most often from developers.
These are the real-world curveballs that Git can throw at you. Having a clear answer ready will make you that much more confident the next time you see those dreaded conflict markers.
What Should I Do If I Mess Up a Merge Conflict Resolution?
First off, don't panic. This is probably the most common fear, and thankfully, Git gives you a fantastic escape hatch. If you're in the middle of resolving conflicts and realize you've made a complete mess, you can instantly hit the rewind button.
As long as you haven't committed the merge yet, just run this command:
git merge --abort
This command is a lifesaver. It stops the merge process cold and puts your branch right back to the state it was in before you started. It's a completely safe way to get a clean slate with zero negative consequences.
Now, what if you've already finished the merge and made the commit? You can still undo it. The command git reset --hard HEAD\~1 will roll back that last merge commit. Just be careful with this one—a hard reset discards any uncommitted local changes you might have. It’s always a good idea to stash anything important before you run it.
What Is the Difference Between Ours and Theirs in a Conflict?
This is a classic point of confusion, and it gets even trickier when you start using rebase. The terms "ours" and "theirs" are relative, and their meaning flips depending on what you're doing.
Here’s the breakdown:
- During a standard
git merge: "Ours" is the branch you’re currently on (yourfeature-branch, for example). "Theirs" is the branch you're pulling in (likemain). - During a
git rebase: The roles are reversed! "Ours" becomes the branch you are rebasing onto (e.g.,main), and "theirs" is your current branch (feature-branch) whose changes are being re-applied.
Actionable Insight: Understanding this distinction is absolutely crucial. I've seen developers accidentally discard their own work during a rebase because they got this backward. Always double-check which operation you're in the middle of before choosing.
Can I Automate Git Merge Conflict Resolution?
For complex, logical conflicts, full automation is a bad idea. An automated script simply doesn't have the context to understand the intent behind the code. But for simpler choices or scripted workflows, you absolutely can.
You can use merge strategies to tell Git to automatically favor one side over the other.
For example, git merge -Xours will resolve every conflict by keeping the version from your current branch. On the flip side, -Xtheirs will automatically accept all the incoming changes. This is really handy for specific, predictable situations, but it's no replacement for a manual review in most day-to-day development. The best approach is to use tools that augment human decision-making, like AI assistants that provide context to help you resolve conflicts faster and more accurately.
Managing code shouldn't feel like you're constantly fighting your tools. At Zemith, we're building an all-in-one AI platform designed to make your development workflow smarter, not just harder. With everything from a coding assistant that helps you debug tough issues to smart notepads that organize your thoughts, Zemith gives you the integrated tools you need to focus on what you love—building great software. .
Explore Zemith Features
Every top AI. One subscription.
ChatGPT, Claude, Gemini, DeepSeek, Grok & 25+ more


Always on, real-time AI.
Voice + screen share · instant answers
What's the best way to learn a new language?
Immersion and spaced repetition work best. Try consuming media in your target language daily.
Voice + screen share · AI answers in real time
Image Generation
Flux, Nano Banana, Ideogram, Recraft + more

Write at the speed of thought.
AI autocomplete, rewrite & expand on command
Any document. Any format.
PDF, URL, or YouTube → chat, quiz, podcast & more
Video Creation
Veo, Kling, Grok Imagine and more

Text to Speech
Natural AI voices, 30+ languages
Code Generation
Write, debug & explain code
Chat with Documents
Upload PDFs, analyze content
Your AI, in your pocket.
Full access on iOS & Android · synced everywhere
Your infinite AI canvas.
Chat, image, video & motion tools — side by side
Save hours of work and research
Transparent, High-Value Pricing
Trusted by teams at
Free
No credit card required
- 100 credits daily
- 3 AI models to try
- Basic AI chat
Plus
- 1,000,000 credits/month
- 25+ AI models — GPT, Claude, Gemini, Grok & more
- Agent Mode with web search, computer tools and more
- Creative Studio: image generation and video generation
- Project Library: chat with document, website and youtube, podcast generation, flashcards, reports and more
- Workflow Studio and FocusOS
Professional
- Everything in Plus, and:
- 2,100,000 credits/month
- Pro-exclusive models (Claude Opus, Grok 4, Sonar Pro)
- Motion Tools & Max Mode
- First access to latest features
- Access to additional offers
What Our Users Say
Great Tool after 2 months usage
"I love the way multiple tools they integrated in one platform. Going in the right direction."
— simplyzubair
Best in Kind!
"The quality of data and sheer speed of responses is outstanding. I use this app every day."
— barefootmedicine
Simply awesome
"The credit system is fair, models are perfect, and the discord is very responsive. Quite awesome."
— MarianZ
Great for Document Analysis
"Just works. Simple to use and great for working with documents. Money well spent."
— yerch82
Great AI site with accessible LLMs
"The organization of features is better than all the other sites — even better than ChatGPT."
— sumore
Excellent Tool
"It lives up to the all-in-one claim. All the necessary functions with a well-designed, easy UI."
— AlphaLeaf
Well-rounded platform with solid LLMs
"The team clearly puts their heart and soul into this platform. Really solid extra functionality."
— SlothMachine
Best AI tool I've ever used
"Updates made almost daily, feedback is incredibly fast. Just look at the changelogs — consistency."
— reu0691