


Every top model, with tools built in.
Search the web, run deep research, read files, create images and run code with GPT, Claude, Gemini, Grok and more.
Learn how to generate HTML code the practical way, from manual structure to AI-powered workflows. Real examples, accessibility tips, and a sanity-saving
You've got a blank index.html file open at 11 p.m., a Figma frame staring back at you, and a deadline that has somehow learned to breathe down your neck. The first <div> feels harmless. Then another appears, then six more, and suddenly you're debugging a layout that looks like it was assembled by a sleepy raccoon.
Learning how to generate HTML code isn't about memorizing every element. It's about choosing a sensible starting point, giving the browser meaningful structure, and checking the result before it reaches production. HTML has been evolving for more than three decades, from Tim Berners-Lee's first version in 1990 through HTML5 and today's living standard maintained by WHATWG and W3C, as this history from W3C explains.
Most developers use one of three routes, depending on the size of the job and how much control they need.
The first is writing markup by hand in a text editor. This remains the cleanest option for a small component, a simple landing page, an email template, or a learning exercise. You choose every element, every attribute, and every nesting relationship. It's slower at first, but there's nowhere for mystery code to hide.
The second route uses templates, starter kits, and frameworks. An HTML5 boilerplate gives you a reliable document foundation. Bootstrap supplies ready-made components and layout conventions. Tailwind UI provides a utility-driven approach, while Eleventy and Astro can turn structured content into complete pages. You give up some raw flexibility in exchange for repeatability and speed.
The third route is AI-assisted generation. You describe the page, its content, semantic requirements, and visual constraints, then use the result as a first draft. The assistant types quickly, but it doesn't understand your product, browser support requirements, or accessibility obligations unless you tell it. Treat its output as scaffolding, not a pull request approved by the gods.
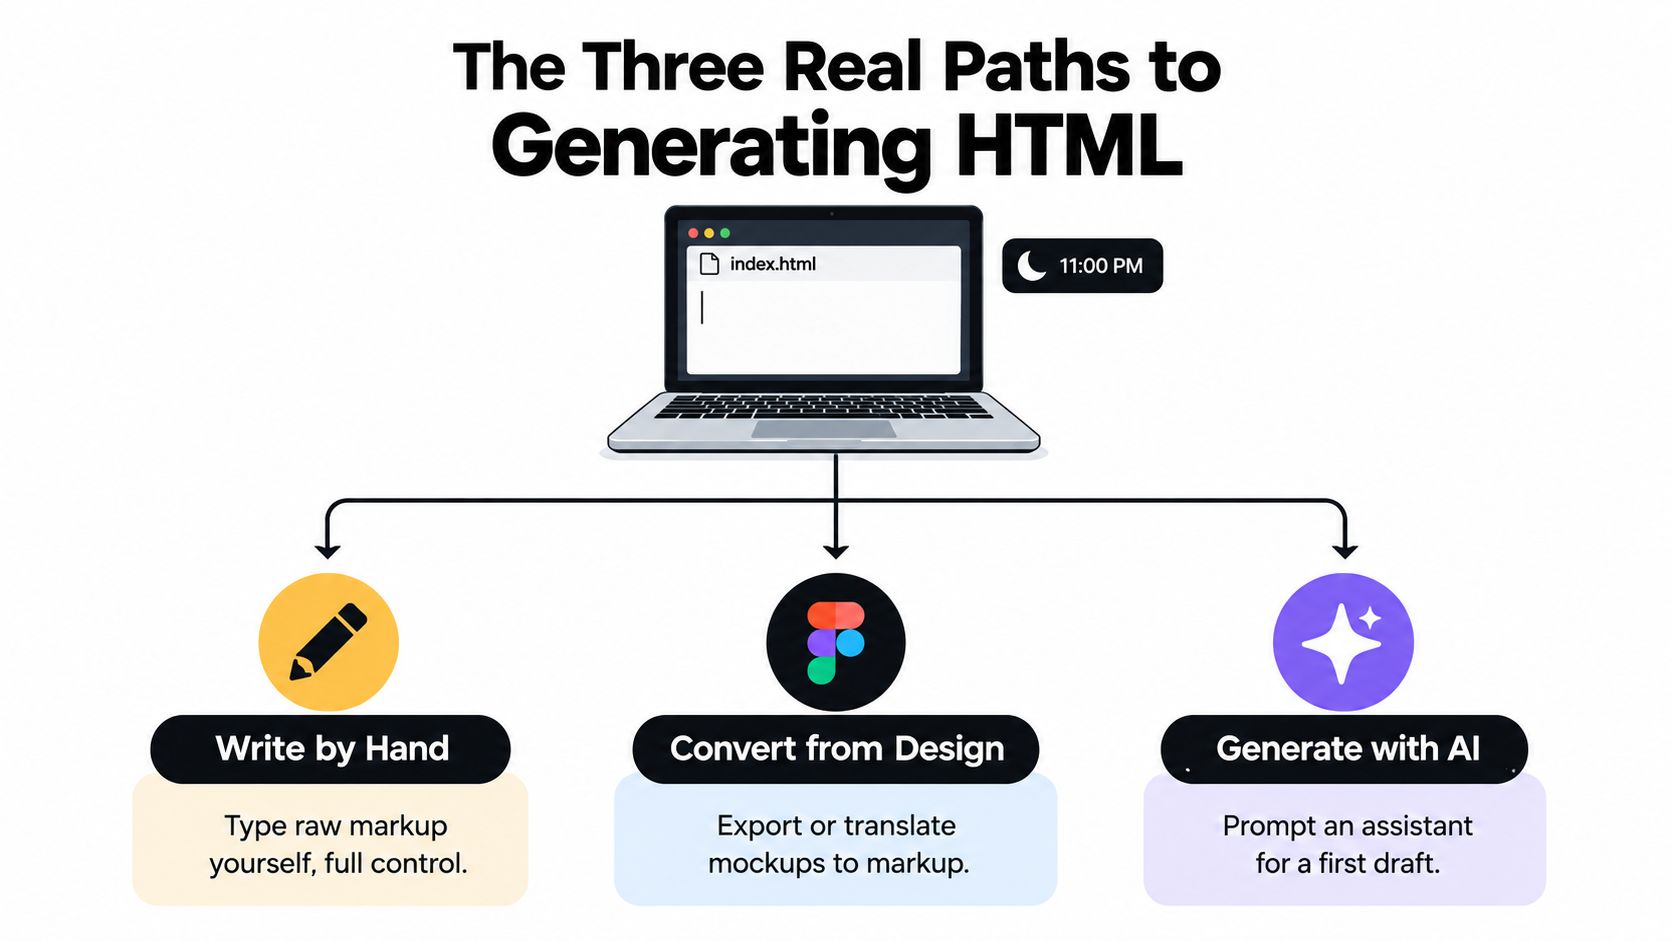
Use hand-written markup when the page is small or the structure itself is the thing you're trying to learn. Choose a template or framework when several people need consistent components or when the page will change regularly. Use AI when the first draft is repetitive, the brief is clear, and you're prepared to review every line.
The rendering decision matters too. A static page, server-rendered page, and client-rendered application have different performance and maintenance trade-offs, so it helps to select the right rendering method before you generate a pile of markup in the wrong place.
For a practical look at using an assistant during this process, see AI tools for code generation. The useful workflow isn't “ask for a website and paste everything.” It's “ask for a constrained draft, inspect it, preview it, and keep the parts that survive testing.”
A browser can be surprisingly forgiving. That's useful when you're experimenting, but dangerous when you mistake “it rendered” for “it's correct.”
Start with <!doctype html>. It tells the browser to use standards mode rather than old compatibility behavior. Next comes the root <html> element. Give it a lang attribute so assistive technology and language-aware tools know how to interpret the page.
The <head> contains information about the document, not the visible page content. Put the character encoding, responsive viewport declaration, title, stylesheet links, metadata, and similar instructions there. The <body> contains what users can see and interact with.

Here's a minimal document you can save as index.html and open directly in a browser:
<!doctype html><html lang="en"><head> <meta charset="utf-8"> <meta name="viewport" content="width=device-width, initial-scale=1"> <title>Contact our team</title> <link rel="stylesheet" href="styles.css"></head><body> <main> <h1>Contact our team</h1> <p>Tell us what you’re building.</p> </main></body></html>
The viewport declaration prevents a mobile browser from treating the page like a shrunken desktop canvas. The <title> gives the browser tab a useful name and provides a basic page label for search results and bookmarks. The lang attribute is small, but omitting it makes language detection less reliable for assistive technology.
HTML is used across the web at enormous scale, and W3Techs tracks its continuing dominance as the markup layer for websites. That ubiquity makes the fundamentals worth getting right. Every template, framework component, and AI-generated fragment still has to become valid document structure in the browser.
Hand-written HTML wins when the surface area is small and the markup needs to stay obvious. A one-page campaign site, a focused prototype, or an email template often becomes harder to maintain when you introduce a framework build process, a dependency tree, and a pile of generated classes. If a framework adds more setup than the page has content, you've hired a forklift to move a sandwich.
Templates and frameworks earn their keep when repetition becomes the problem. A team building many pages benefits from shared components, naming conventions, responsive utilities, and an established way to handle buttons, navigation, forms, and states. Bootstrap makes common interface patterns quick to assemble. Tailwind is useful when a team wants utility classes and close control over styling. An HTML5 boilerplate is a sensible plain-markup starting point, while Eleventy and Astro fit content-heavy sites that benefit from reusable templates and generated pages.
Ask four questions before choosing:
A framework isn't automatically more professional, and hand-written markup isn't automatically cleaner. The right choice minimizes the kind of work your project will repeat.
For React teams, a React live preview workflow can make component feedback faster, particularly when the visual result matters as much as the source. AI-generated markup belongs between these options. It resembles hand-written HTML because a human still owns the final lines, but it can remove much of the repetitive typing.
An AI coding assistant works best as a junior pair-programmer who types very fast and occasionally invents a class called hero-super-final-v2. Give it a vague request and you'll often get generic structure, missing requirements, and decorative markup that looks plausible until you try to maintain it.

Start with a prompt that specifies intent, structure, constraints, and quality checks:
Create a responsive contact page in plain HTML and CSS. Use
header,nav,main,section, andfooteronly where their roles are real. Include oneh1, a logical heading hierarchy, descriptive link text, useful alt text for meaningful images, keyboard-accessible controls, and labels associated with every form field. Do not use inline styles, invented frameworks, or unnecessary ARIA. Return the HTML first, then briefly explain the structure.
That prompt gives the assistant a job it can reason about. It also gives you a review checklist. Before accepting the output, inspect the landmarks, confirm that headings describe sections rather than font sizes, and remove classes that have no corresponding CSS or purpose.
Check the generated document in this order:
alt, for, id, type, name, and autocomplete present where they should be?For a div-heavy section, ask for a targeted refactor rather than regenerating the whole page:
Refactor this section into semantic HTML. Replace generic containers with appropriate
article,header,section,ul, andbuttonelements where justified. Preserve the visible content and class names that are used by the stylesheet. Explain each structural change and flag anything that needs a human decision.
You can also use AI-powered design tools when the starting point is a visual brief rather than a written component specification. Layout-heavy work benefits from a prompt that describes hierarchy, spacing, responsive behavior, and visual references. Logic-heavy work needs more attention on states, data, form behavior, and edge cases.
For more workflow ideas, AI-assisted coding is a useful companion to the prompt-and-review approach.
One benchmark illustrates why the review step isn't optional. In the McEval multilingual code benchmark, GPT-4 achieved about 32% pass@1 on HTML generation tasks, compared with 76% on Python tasks, as reported in the benchmark discussion of HTML's semantic challenges. HTML's nesting rules and document context create plenty of opportunities for a fast first draft to be wrong.
Practical rule: Never paste AI-generated HTML into a project without diffing it first.
Generated markup is only useful after it survives contact with a browser, a keyboard, and assistive technology. A good quality gate has four distinct jobs, because no single tool catches every failure.
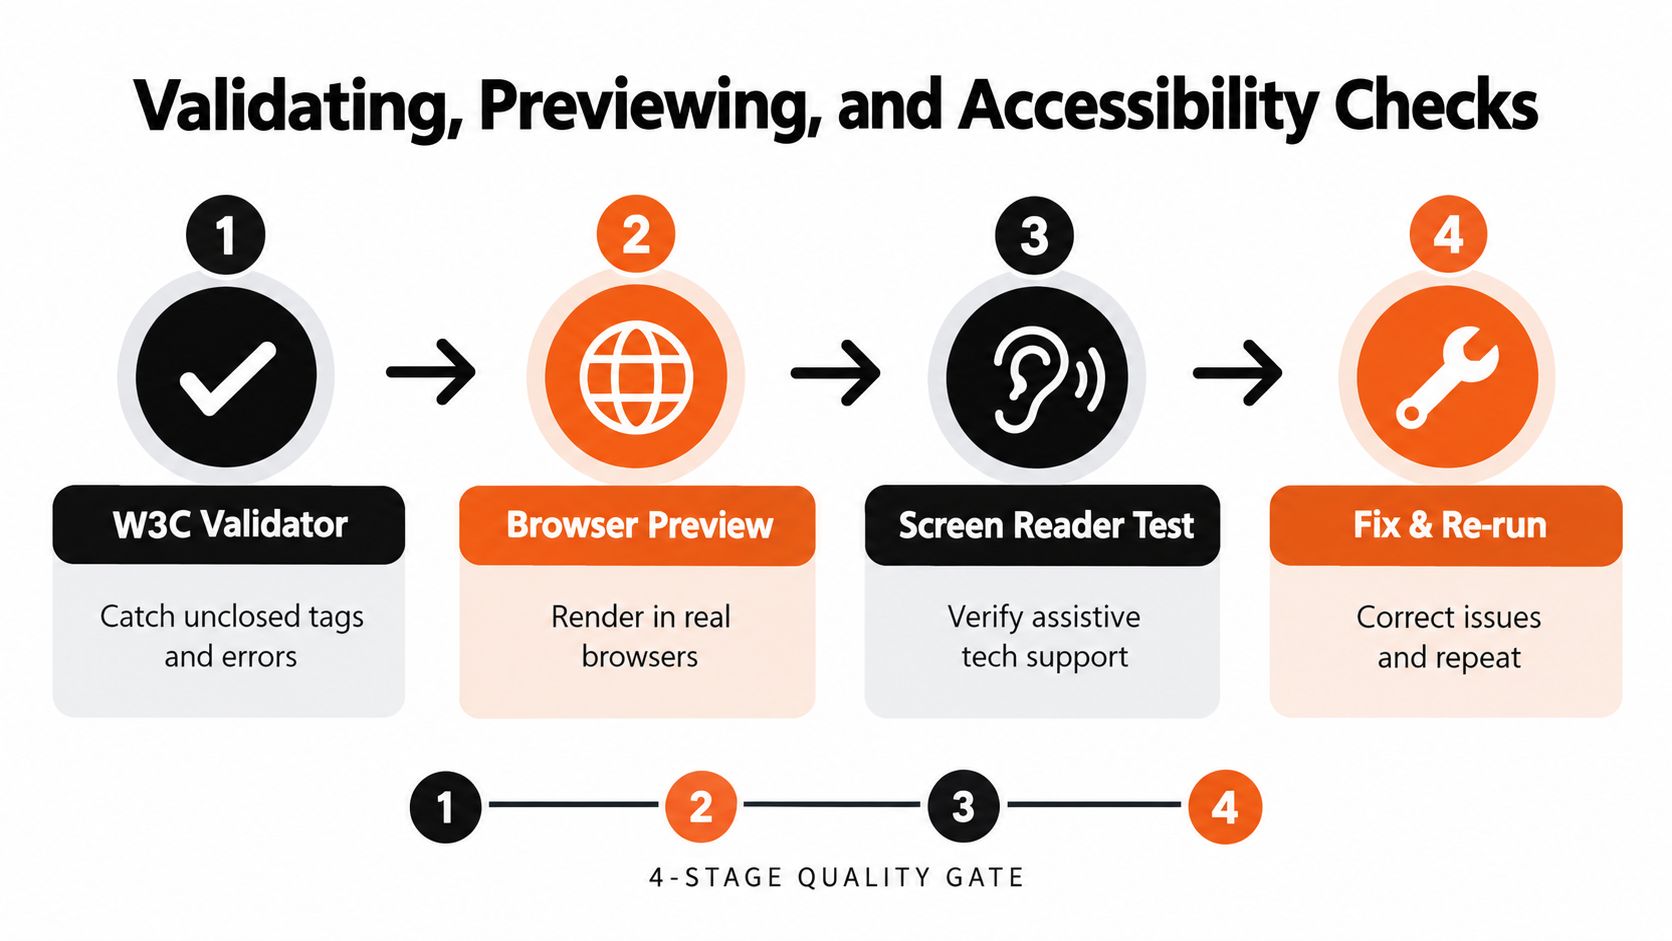
Start with the W3C Markup Validator. It catches malformed syntax, missing closing tags, invalid attributes, and nesting errors. You find the structural mistakes that might be invisible in a forgiving browser.
Open a live preview. Look for missing assets, broken paths, collapsed sections, overflow, unexpected default margins, and layouts that only work at one viewport width. A valid document can still be a terrible interface.
Run Lighthouse or axe. Automated audits can flag missing alternative text, weak color contrast, unlabeled controls, and other accessibility concerns. They don't understand every interaction, but they're excellent at finding common omissions early.
Use the keyboard and a screen reader. Press Tab through the page. Confirm that focus moves in a sensible order, visible focus isn't lost, controls can be activated, and a skip link reaches the main content. A screen reader exposes problems that a visual preview politely hides.
This UK website accessibility guide provides useful additional context for making interfaces easier to use. Semantic HTML matters because browsers and assistive technologies already understand elements such as headings, lists, tables, navigation, main content, articles, and footers. Replacing all of those with anonymous div elements means rebuilding meaning the browser already provides for free.
The same principle applies to images. Write alternative text based on the image's purpose, not its file name, and use a practical guide to describing an image when the visual context is difficult to summarize.
Make the checks easy to repeat. Connect a validator, accessibility audit, or preview command to a keyboard shortcut or pre-commit hook. The best quality gate is the one that takes less effort than ignoring the bug.
A contact form exposes weak HTML quickly. It combines structure, user input, validation, labels, submission behavior, and status feedback in one small component. Start with the form element, not a wrapper packed with classes:
<form action="/contact" method="post">
action identifies the submission endpoint. method="post" tells the browser to send the form data in a request. Related controls belong inside a <fieldset>, with a <legend> when the group needs a visible or programmatic label. If the first draft comes from a visual mockup, a screenshot-to-code workflow can speed up the markup. Treat its output as a starting point, then correct the semantics yourself.
Choose an input type that matches the data. An email input gives the browser a native validity constraint. Attributes such as required, pattern, and minlength cover basic rules without custom JavaScript, as MDN's form validation guidance explains.
Every label needs to target the correct control. for="email" must match id="email", and every submitted control needs a useful name for the server-side request. Explicit pairing also gives browsers and assistive technologies a clear relationship. This explanation of HTML forms and validation explains why those associations matter.
This compact pattern is valid:
<label>Email <input type="email"></label>
It becomes harder to maintain when the form gains styling hooks, error messages, or a more complex layout. Use explicit associations instead:
<label for="email">Email address</label><input id="email" name="email" type="email" autocomplete="email" required>
Set autocomplete deliberately. It helps browsers suggest stored information and clarifies the field's purpose. Set a button's type too. A button inside a form defaults to submission, which can trigger an unwanted request when it was meant to perform another action.
Client-side validation supports the experience, but it does not replace server-side checks or business rules. Keep those rules on the server, use native constraints for immediate feedback, and let aria-live="polite" announce status updates without interrupting the user.
The fastest reliable workflow isn't the one that produces markup in a single dramatic burst. It's the one that catches cheap mistakes while they're still cheap to fix.
The highest-impact habit is pairing fast generation with manual review. AI can draft a page, convert a design direction into a starting point, or refactor repetitive markup, but it won't reliably notice every missing label, incorrect parent-child relationship, or unclosed tag. For teams exploring more advanced HTML generation, current guidance also points to a gap between copy-paste FAQ generators and the broader workflow of structuring, styling, previewing, validating, and adapting output for a real CMS or deployment setup, as illustrated by this FAQ HTML generator workflow.
Use the tool that matches the job, then make the browser prove the result works.
Zemith brings code generation, debugging, explanations, and live previews for HTML and React components into one workspace, so you can turn a clear brief into a draft without giving up review control. Try the Zemith coding workflow, preview the result, and keep the markup that holds up.







Trusted by teams at






The top models, plus image, video and voice tools, in one plan.
Without Zemith
ChatGPT PlusUS$20.00Claude ProUS$20.00Google AI ProUS$19.99SuperGrokUS$30.00Perplexity ProUS$20.00 MidjourneyUS$10.00
 ElevenLabsUS$6.00Le Chat ProUS$14.99
 RunwayUS$15.00Kling StandardUS$8.80
 Gamma PlusUS$12.00
 Otter ProUS$16.99
 QuillBot PremiumUS$19.95
 Photoroom ProUS$12.99
 Quizlet PlusUS$7.99
Total if paying separatelyUS$234.70/mo
"I love the way multiple tools they integrated in one platform. Going in the right direction."
— simplyzubair
"The quality of data and sheer speed of responses is outstanding. I use this app every day."
— barefootmedicine
"The credit system is fair, models are perfect, and the discord is very responsive. Quite awesome."
— MarianZ
"Just works. Simple to use and great for working with documents. Money well spent."
— yerch82
"The organization of features is better than all the other sites — even better than ChatGPT."
— sumore
"It lives up to the all-in-one claim. All the necessary functions with a well-designed, easy UI."
— AlphaLeaf
"The team clearly puts their heart and soul into this platform. Really solid extra functionality."
— SlothMachine
"Updates made almost daily, feedback is incredibly fast. Just look at the changelogs — consistency."
— reu0691
Hand off the research, writing, design and follow-ups. Zemith picks the tools it needs and brings back finished work.
Search the web, run deep research, read files, create images and run code with GPT, Claude, Gemini, Grok and more.
Zemith keeps working in the cloud and pings you when it's done.
Notion, Linear, Canva, Airtable and more. It asks before it creates or changes anything.
Docs, slides, sheets and PDFs, ready to send.
Chain models and tools on a visual canvas, from one prompt to a finished promo video.
Briefings, reports and reminders run on a schedule and are ready when you need them.
Real-time voice that can see your camera or screen.
The best image and video models, in one studio.
Turn PDFs, links and YouTube videos into podcasts, quizzes, flashcards and mind maps.
<form action="/contact" method="post"> <fieldset> <legend>Send us a message</legend> <p> <label for="name">Name</label> <input id="name" name="name" type="text" autocomplete="name" required> </p> <p> <label for="email">Email address</label> <input id="email" name="email" type="email" autocomplete="email" required> </p> <p> <label for="phone">Phone number</label> <input id="phone" name="phone" type="tel" autocomplete="tel"> </p> <p> <label for="message">Message</label> <textarea id="message" name="message" rows="6" required></textarea> </p> <button type="submit">Send message</button> <p aria-live="polite" id="form-status"></p> </fieldset></form>














 Podcast
 Quiz
Quiz Flashcards
 Mind map
 Infographic