


Every top model, with tools built in.
Search the web, run deep research, read files, create images and run code with GPT, Claude, Gemini, Grok and more.
Learn how to remove object from photo AI cleanly: select the right area, check shadows, fix common glitches and protect your original file.
You're scrolling a holiday photo and a stranger has parked themselves at the edge of the frame, bag in hand, like they paid for the trip. The group chat is waiting. You want that person gone in about five minutes, and you want the pavement and the railing to still look like they were always there.
That's the job when you remove object from photo AI. The brush click is the easy bit. What makes the edit hold up is the shadow, the pale halo, and an honest look at whether you changed what the picture claims. I've cleaned up a lot of these, and the ones that look fake almost always skipped the same two checks.
Say the stranger stands just inside the right edge of a beach path shot. You want a clean frame before dinner, not a retouching project. Work in passes, not one giant paint blob.
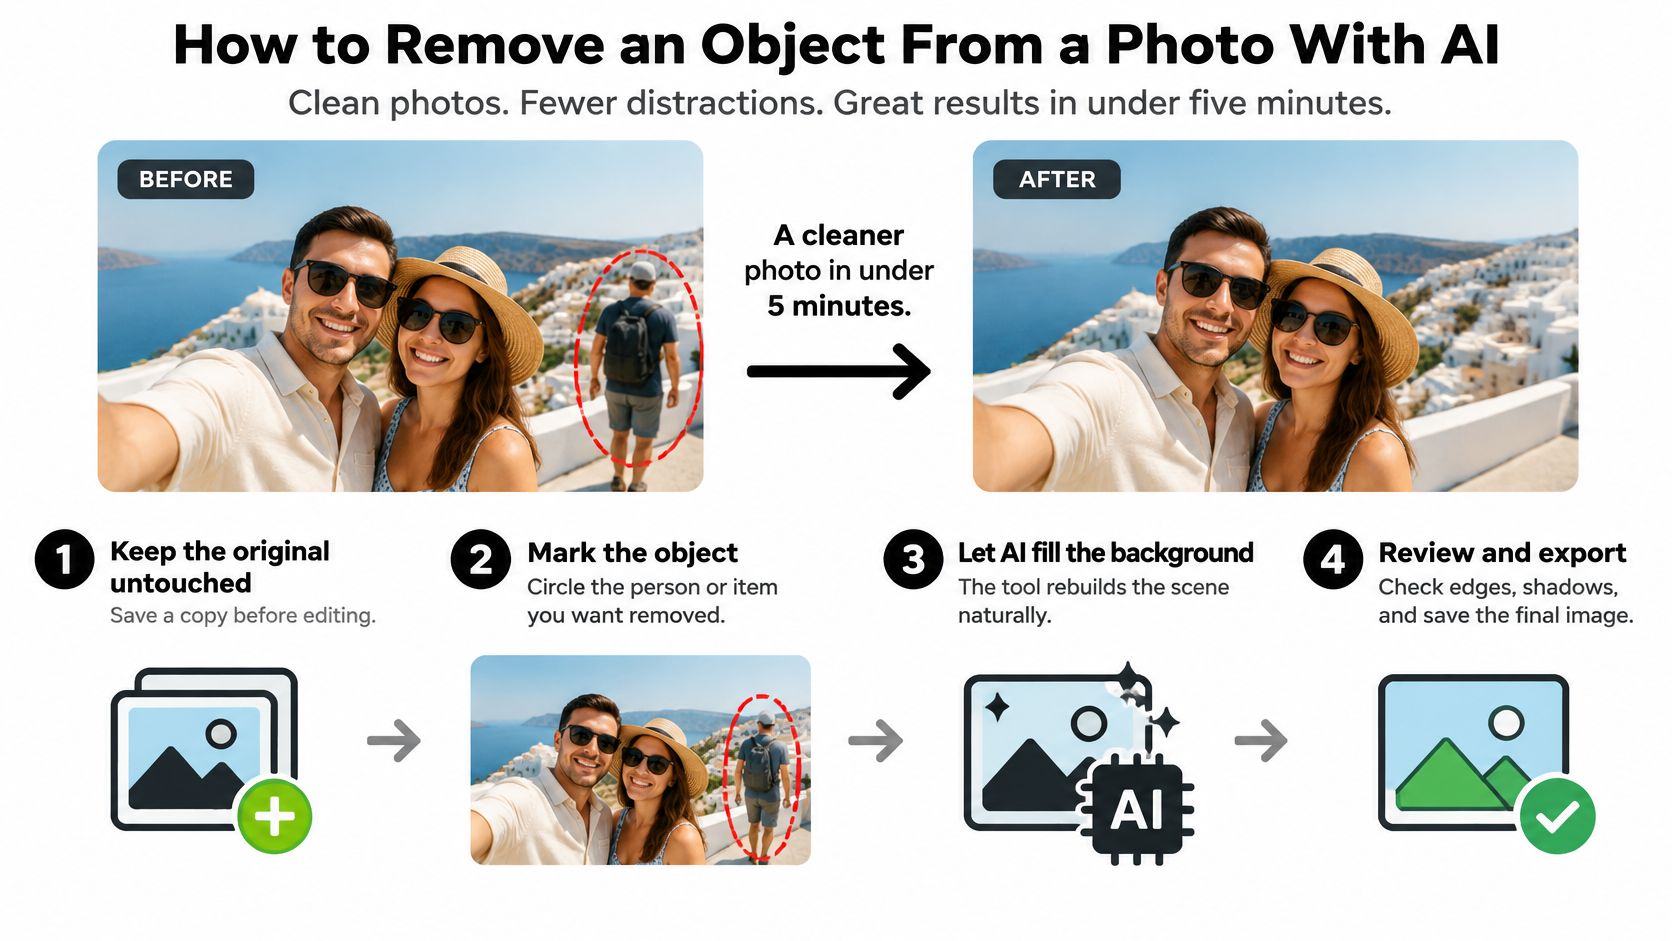
Step 2 is the one people skip. A tight outline leaves antialiased fringe and a dark footprint. Widen it a little and the fill has room to continue the ground instead of tracing the person.
On that holiday frame, the first pass left a pale smudge and a dark shadow where the stranger stood. Widening the mask by about three pixels to cover the shadow, then running three variations, gave a version with continuous paving and an unbroken railing. The untouched original sat in a folder right beside it.
The same habit helps when you need consistent team headshots at scale: pick the clean variation, don't ship the one with a halo on someone's shoulder. If you want the wider editing flow around this, the guide to editing images with AI covers how selection, fill, and a second look fit together.
Practical rule: One object, a slightly fat mask, a few variations, then a zoom check. That's the whole five-minute routine.
You should walk away with one clean pass, the original still saved, and the habit of looking at the shadow before you hit share.
A lot of people assume the editor handles privacy because the person is gone. It doesn't. The file can still tell on you.

Before you upload, ask four blunt questions. Does the image leave the device? How long is it stored? Might it be used for model training? Can you process a copy locally instead? Cloud tools can send photos that include faces and sensitive places. Plain Spoken Tech points out that AI editing does not automatically remove embedded location data, so a normal vacation shot can still reveal a precise spot after the unwanted person is gone.
Keep the untouched original in a separate folder. Export a cleaned copy. Open that export in a metadata viewer and look for GPS and other EXIF before it goes anywhere. If the coordinates are still there, strip them on the copy, not on the master.
Kids, confidential documents, property listings, and workplace images are a different call. If you wouldn't hand the file to a stranger, don't upload the original at all. Crop a local copy, or skip the cloud pass.
A short walkthrough of what stays in a file after an edit is worth ten minutes if you share photos for work:
Folder habits matter as much as the brush. The notes on digital asset management best practices are a useful place to park originals so a cleaned export never overwrites them.
Removing the person is only half the job if the file still carries the location.
The selection decides most of the result. Remove object from photo AI works by masking a region, dropping those pixels, and rebuilding the background from what's around it. Pick the wrong shape and you spend the next ten minutes arguing with a fence.
A dust spot only needs a dab. A background person needs the whole body plus the shadow on the ground, or you'll get a floating dark patch that looks like a bad special effect. Wires want one thin strip for the full length. Stop halfway and the skyline kinks. Signs should be taken as a whole panel. Cut through a letter and the model writes nonsense. Tiles and fences want a modest margin, about 4 to 6 pixels, not a huge hole, or the pattern clones itself. If the object eats more than half the frame, crop first or split the job. There isn't enough surrounding scene left to guess from.
Brushing a little past the visible edge beats selecting only the center. One tested inpainting setup expanded mask edges with an 11×11-pixel morphological dilation so leftover borders were less likely to show, as described in this International Journal of Computer Vision article. Skip that and you keep a mysterious halo, the digital version of forgetting to erase pencil marks.
Zemith includes image to prompt, remove background, image upscaler, generative fill, and replace objects tools, so you can match the tool to the object instead of forcing one brush to do every job. Background cleanup is a different move from filling a hole, which is why the steps for removing an image background are worth separating from this workflow.
If the object is more than half the frame, crop or split. A giant mask is how you get a dream sequence instead of a photo.
The glitch I see most is a faint ghost outline or a dark halo after the first pass. The mask stopped on the visible edge, so a rim of the person and their contact shadow stayed in the picture. Don't paint over the smudge by hand first. Fix the mask and run it again.
Smeared tiles and fences usually clear if you shrink the selection. A smaller hole gives the model a repeating pattern it can follow. Bent railings and door frames happen when the mask eats the line. Keep the line outside the selection, even if that means two skinny passes instead of one fat one.
Garbled text is the model trying to be helpful. Leave shop lettering outside the mask, or fix those letters by hand. A face that warps near the boundary wants a tighter mask and a few variations, not a bigger brush. Shadows and reflections are the usual culprits on the rest. Add that dark patch or the glint in a window to the mask and run removal again. One extra pass beats ten minutes of manual cloning.
If the same model keeps smearing a surface, you can switch AI models at any time, even in the middle of a chat, and compare outputs without starting the file over. Listing photos punish this stuff. A bent skirting board reads as a bad renovation. A solid real estate photo editing workflow is picky about lines for that reason. When the fill needs more scene around a tight crop, an AI image extender can give the model context, but only after the ghost is gone.
Fix the cause in the mask before you touch the output. Retouching a bad fill just hides the mistake under another one.
Shrink the export to thumbnail size once. If the seam disappears at a normal viewing distance, nobody in the group chat will hunt for it. If it still looks like a patch, it will look worse on a phone.
For journalism, insurance claims, legal evidence, or marketplace listings, either say the image was edited or skip any removal that changes what the photo shows. A missing dent or a vanished person can change the story. Everyday social posts are looser. A clean edit plus an honest caption is usually enough.
Generative removal builds new pixels. It does not dig the old background out of hiding. Adobe's generative fill guide notes that each generation can produce different content, and the safer habit is a masked layer you can turn off so the original object comes back. Keep that original beside every export, and inspect faces, text, repeated patterns, and straight lines at high zoom. Those are where invented content looks subtly wrong.
The same honesty shows up in odd places. If you're designing your own kick drum head, a tidy graphic still shouldn't invent hardware that was never on the drum. Photos work the same way.
Zemith brings together more than 20 AI models in one app, which is handy when one fill smears tiles and another keeps the grout lines. You can also describe an image first so you know what the scene is claiming before you erase part of it.
Open one photo that needs cleanup, run two or three removal variations, and check edges, shadows, and the original file before anything goes online.
Zemith puts object removal, generative fill, and the rest of the image tools in one workspace, so you can mask a distraction, compare a few fills, and keep the original close. If a holiday frame, a listing, or a product shot has something in it that shouldn't, bring that file over and run the checks above before you publish. Start with one messy photo on Zemith.
Creative Studio also covers background removal, upscaling, image editing and short video, all drawn from the same credit allowance as chat. Nano Banana Pro starts at 25,300 credits an image, and the studio shows the exact quote before you generate.
Free $0 (chat with the free models) · Plus $15.99/month · Professional $29.99/month. Prices in USD.
Pay less than one AI subscription and get GPT, Claude, Gemini and more, plus 50+ AI tools.


Trusted by teams at
The top models, plus image, video and voice tools, in one plan.
Without Zemith
ChatGPT PlusUS$20.00Claude ProUS$20.00Google AI ProUS$19.99SuperGrokUS$30.00Perplexity ProUS$20.00 MidjourneyUS$10.00
 ElevenLabsUS$6.00Le Chat ProUS$14.99
 RunwayUS$15.00Kling StandardUS$8.80
 Gamma PlusUS$12.00
 Otter ProUS$16.99
 QuillBot PremiumUS$19.95
 Photoroom ProUS$12.99
 Quizlet PlusUS$7.99
Total if paying separatelyUS$234.70/mo
"I love the way multiple tools they integrated in one platform. Going in the right direction."
— simplyzubair
"The quality of data and sheer speed of responses is outstanding. I use this app every day."
— barefootmedicine
"The credit system is fair, models are perfect, and the discord is very responsive. Quite awesome."
— MarianZ
"Just works. Simple to use and great for working with documents. Money well spent."
— yerch82
"The organization of features is better than all the other sites — even better than ChatGPT."
— sumore
"It lives up to the all-in-one claim. All the necessary functions with a well-designed, easy UI."
— AlphaLeaf
"The team clearly puts their heart and soul into this platform. Really solid extra functionality."
— SlothMachine
"Updates made almost daily, feedback is incredibly fast. Just look at the changelogs — consistency."
— reu0691
Hand off the research, writing, design and follow-ups. Zemith picks the tools it needs and brings back finished work.
Search the web, run deep research, read files, create images and run code with GPT, Claude, Gemini, Grok and more.
Zemith keeps working in the cloud and pings you when it's done.
Notion, Linear, Canva, Airtable and more. It asks before it creates or changes anything.
Docs, slides, sheets and PDFs, ready to send.
Chain models and tools on a visual canvas, from one prompt to a finished promo video.
Briefings, reports and reminders run on a schedule and are ready when you need them.
Real-time voice that can see your camera or screen.
The best image and video models, in one studio.
Turn PDFs, links and YouTube videos into podcasts, quizzes, flashcards and mind maps.











 Podcast
 Quiz
 Flashcards
 Mind map
 Infographic